One very common question people ask is how to reinstall and properly time their distributor after having removed it from the engine for one reason or another. Itís really a pretty simple process. Allow me to explain.
When you go to reinstall the distributor, the first step is to find TDC (top dead center) on the compression stroke for number one cylinder. There are a few different ways to do this.
First, if you have the valve covers off because of other work you've been doing, you can just watch the rocker arms. Look at the passenger side cylinder bank, and the front most pair of rocker arms. Turn the engine until you see both rockers operate (one right after the other). This will put you at TDC on the intake stroke for cylinder number one. Go one more turn, and you'll be at TDC on the compression stroke, which is where you want to be.
The second option, if you don't have the valve covers off, is to pull the spark plug out of cylinder number one and stick your thumb over the hole. Turn the engine till you feel air pressure against your thumb, which will mean the piston is going up on the compression stroke. Bring it up to where the "0" mark on the damper lines up with the timing reference(more on that later), and you'll be at #1 compression stroke TDC.
The third, and arguably easiest option, is to just bring the engine to top dead center on number one cylinder, and it'll be either on TDC of the compression stroke or TDC of the intake stroke, so you've got a 50/50 chance of being right the first time.
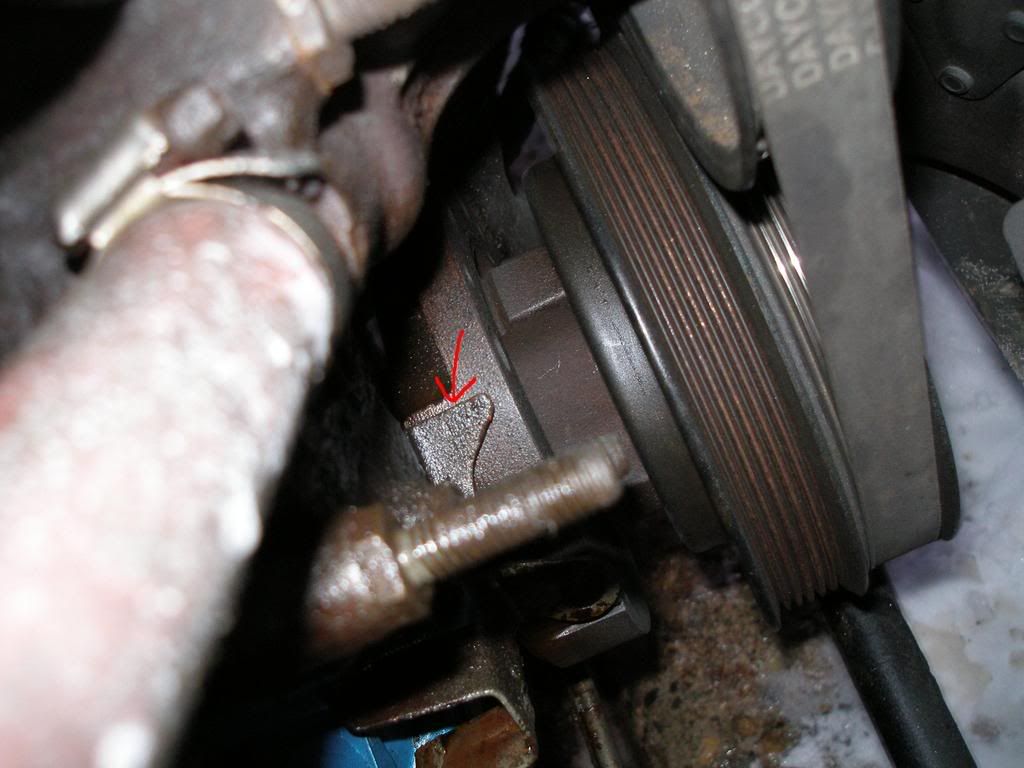
Here's the timing reference down by the harmonic damper. This is where you line up the "0" mark on the damper:
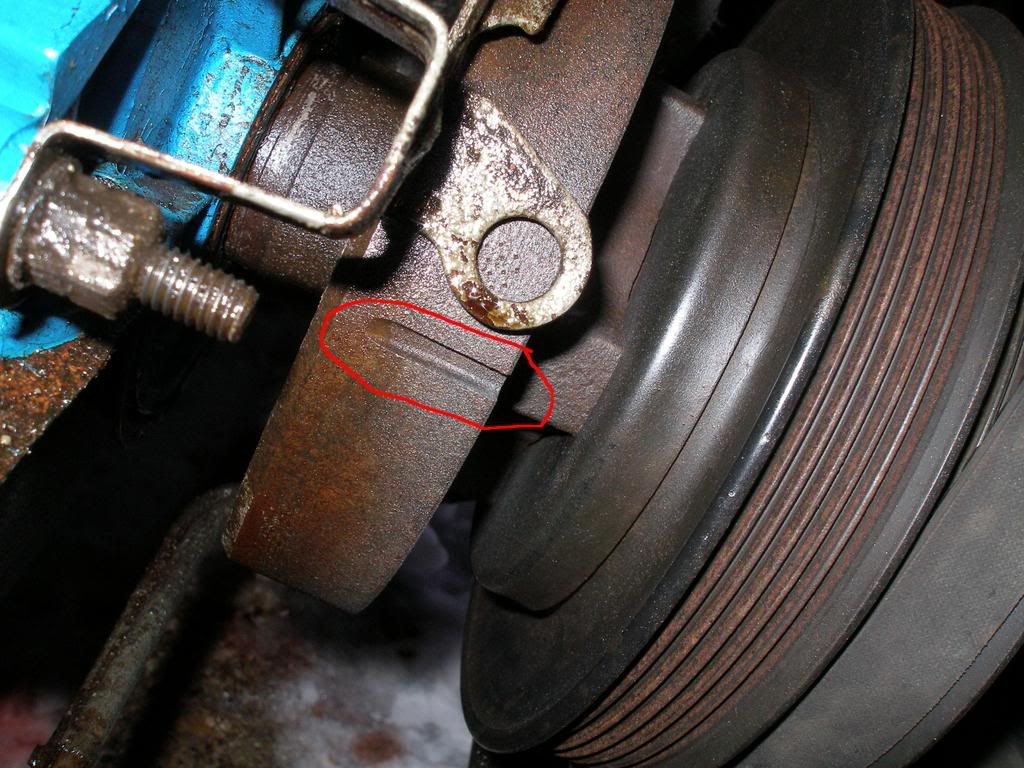
One word of warning--there's a big notch on the side of the damper. That is NOT the "0" mark! If you try to use that for your reference, you'll NEVER get it right.
For turning the engine over, you can do it by hand with a breaker bar and a socket, but if the radiator and everything are in place, this is kind of a pain to do. I prefer to let the starter motor do the work.
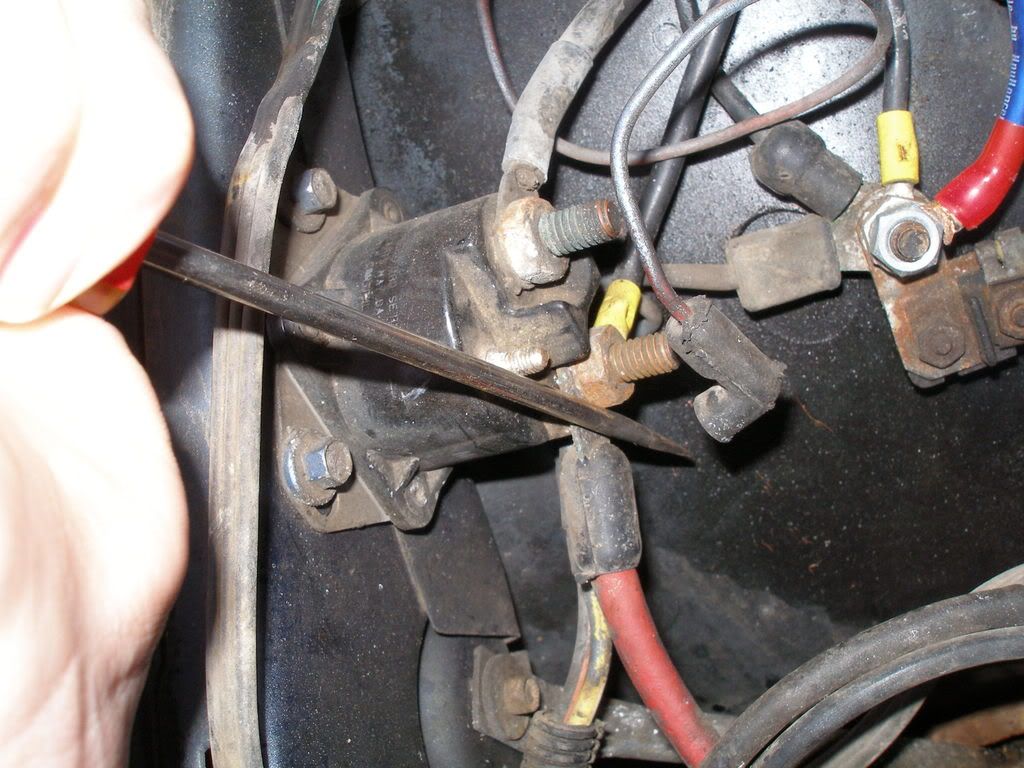
If you have a remote starter switch, you can wire that up and use it, but if you don't have one, a screwdriver works pretty well, too. This shows the two studs on the starter solenoid that need to be bridged. The small one on the top has a connector on it that you'll have to remove. The solenoid is located on the passenger side fenderwell, right behind the battery. Just make sure you reconnect the wire on that top connector when you go to try to start the car, or it won't turn over and you'll be very confused as to what's gone wrong. I've done it countless times, and feel like a moron each and every time.
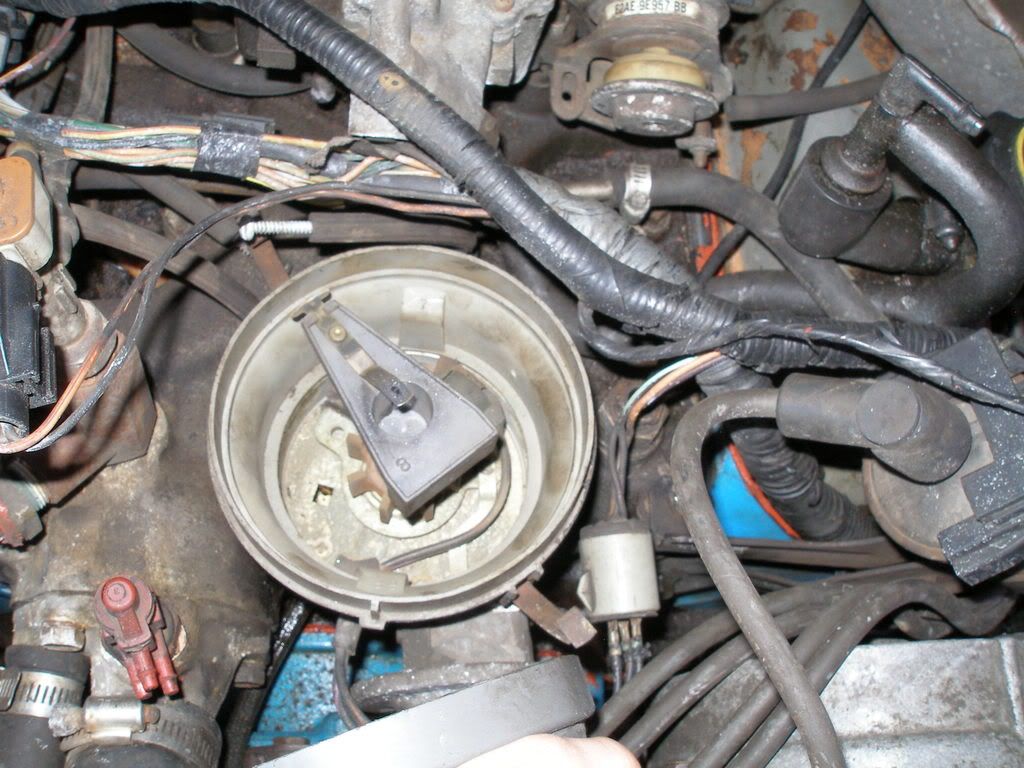
Now, once you get the engine lined up where you want it, it's time to drop the distributor in! You'll want to line the rotor up with the number one position on the distributor cap, which is about 11 o'clock:
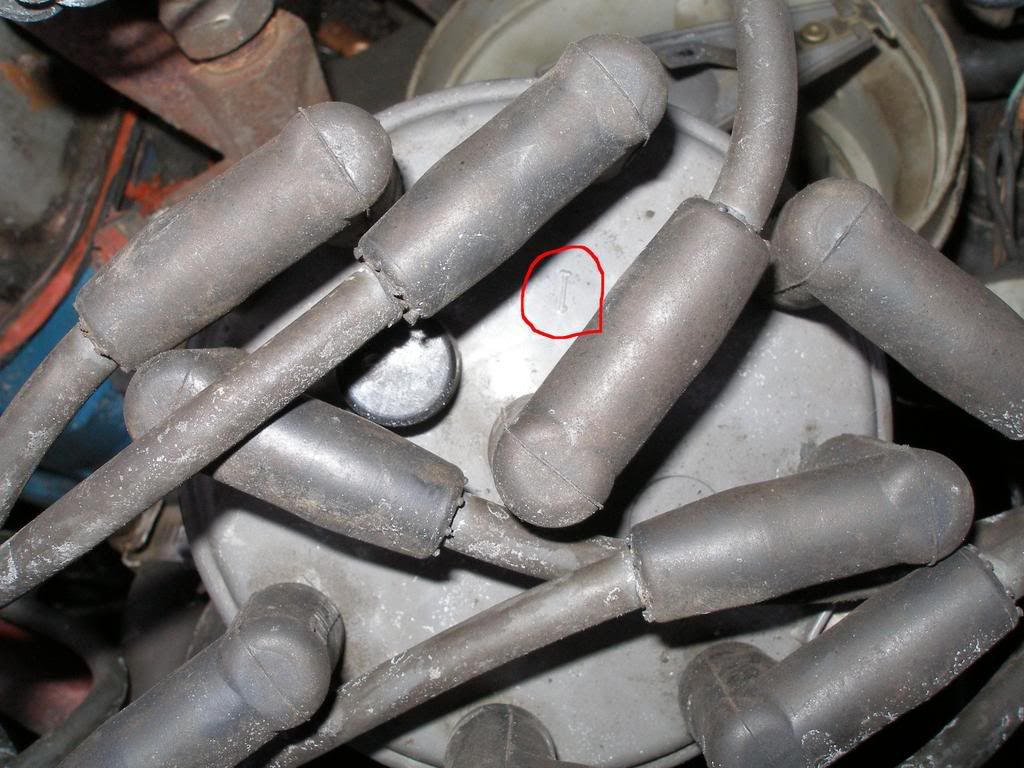
If you're not sure, you can go by the cap itself--the number one position is marked.
At this point, the distributor should be dropped in far enough that the rotor is engaged, but there's one more important step. The bottom of the distributor shaft is also what drives the oil pump, and that has to be lined up so that it will drop in all the way. If you look at the base of the distributor, you'll notice that it's sitting slightly above the block. This is because the oil pump driveshaft isn't engaged yet. The way to get it engaged is to hold the distributor with one hand (might want to put just a little down pressure on it) and then turn the engine over as described previously. Shouldn't take more than half a turn and it'll drop into place.
Once you've got that done, reinstall the distributor cap and your plug wires, and assuming you did everything right, it should run. If it fires but doesn't quite take off and run, you probably got it in 180 degrees out of phase. If that's what happened, then turn the engine over so that the rotor is pointing at the number one position again, pull the distributor out, turn the engine over one more turn, and drop the distributor back in. Now it should be right.
Got it running? Great! Now you need to get your timing set correctly.
The title of this thread said that it was partially carb specific, and this is the carb specific part. For you CFI/EFI guys, everything up to this point is the same.
On the driver's side fenderwell, you'll see the Duraspark box, which will have either two or three connectors coming out of it, depending on which generation of Duraspark you have (DSII vs. DSIII). DSII boxes have two connectors, one with three prongs and one with two. DSIII boxes have three connectors, one with three prongs and two with two prongs. It's one of the two prong connectors you'll want to disconnect. On DSII systems it's easy--there's only one to choose from. On DSIII systems, disconnect one of the two prong connectors and see if you can start the car. If it starts, you got the right one. If not, reconnect it and disconnect the other one.
Once you've deciphered your connectors, the male end of the one you disconnected needs to be bridged. If you've got a piece of wire with alligator clips on either end, that works great, or you can sometimes stick a screwdriver in there. Get creative.
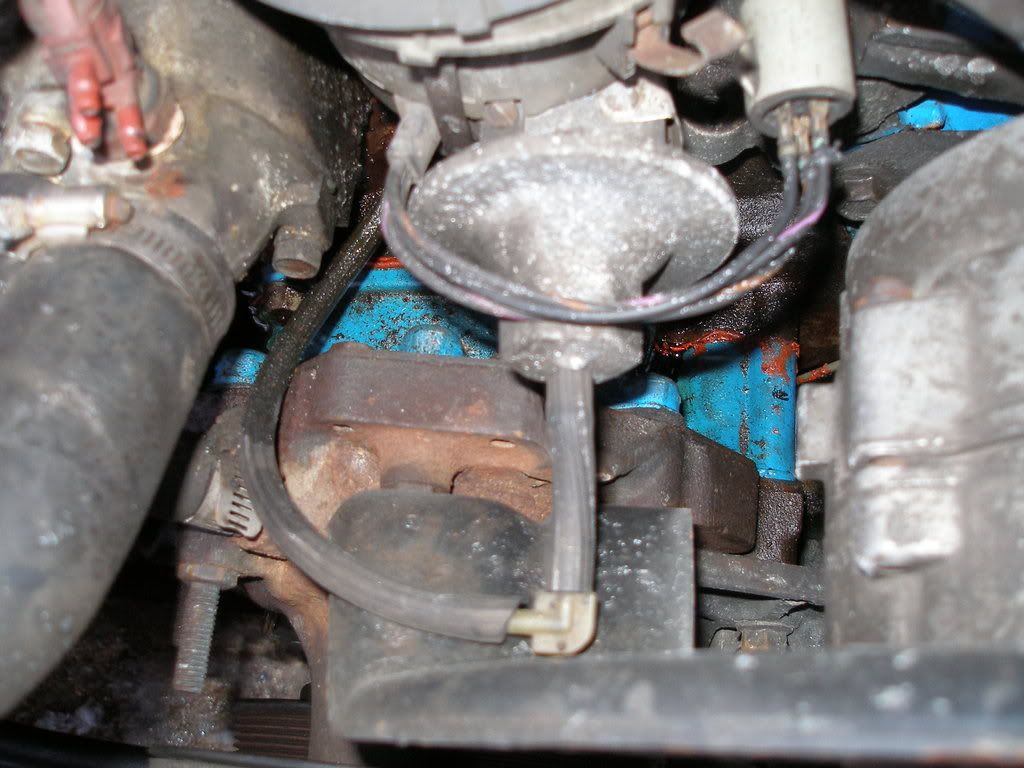
Next step is to disconnect and plug off the vacuum advance hose, which, just in case you donít know, is this one right here:
For a plug, whatever is handy and will fit into the end is fine. I usually dig up a sheet metal screw and stick it in there. Again, get creative and youíll find something that works fine.
Before you go any further, youíll want to mark the location of your base timing on the damper. Stock is 10 degrees BTDC, but some non-stock applications will require more or less, so use whatever youíve figured out to be right in the past. The reason youíll want to mark it is that it can be very difficult to see those timing marks with the engine running. I usually use white chalk as it seems to mark the damper just fine even if thereís a little bit of oil or grease on it, and itís easy to wipe it back off if you want to mark a different spot later on.
Now, hook up your timing light according to the manufacturerís instructions, making sure to keep the cables out of the way of the fan and belts. Start the car, and trigger the timing light at the balancer. Hopefully youíll see your timing mark around the general vicinity of the reference mark. Take hold of the distributor and turn it until the mark you made on the balancer moves up to align with the reference mark. Turning the distributor clockwise will advance it, and counterclockwise will retard it.
After thatís done, shut the car off, disconnect the timing light, reconnect the vacuum advance, and reconnect the plug on the Duraspark box.
Hope this is helpful the next time you have to pull the distributor from your engine!
When you go to reinstall the distributor, the first step is to find TDC (top dead center) on the compression stroke for number one cylinder. There are a few different ways to do this.
First, if you have the valve covers off because of other work you've been doing, you can just watch the rocker arms. Look at the passenger side cylinder bank, and the front most pair of rocker arms. Turn the engine until you see both rockers operate (one right after the other). This will put you at TDC on the intake stroke for cylinder number one. Go one more turn, and you'll be at TDC on the compression stroke, which is where you want to be.
The second option, if you don't have the valve covers off, is to pull the spark plug out of cylinder number one and stick your thumb over the hole. Turn the engine till you feel air pressure against your thumb, which will mean the piston is going up on the compression stroke. Bring it up to where the "0" mark on the damper lines up with the timing reference(more on that later), and you'll be at #1 compression stroke TDC.
The third, and arguably easiest option, is to just bring the engine to top dead center on number one cylinder, and it'll be either on TDC of the compression stroke or TDC of the intake stroke, so you've got a 50/50 chance of being right the first time.
Here's the timing reference down by the harmonic damper. This is where you line up the "0" mark on the damper:

One word of warning--there's a big notch on the side of the damper. That is NOT the "0" mark! If you try to use that for your reference, you'll NEVER get it right.

For turning the engine over, you can do it by hand with a breaker bar and a socket, but if the radiator and everything are in place, this is kind of a pain to do. I prefer to let the starter motor do the work.
If you have a remote starter switch, you can wire that up and use it, but if you don't have one, a screwdriver works pretty well, too. This shows the two studs on the starter solenoid that need to be bridged. The small one on the top has a connector on it that you'll have to remove. The solenoid is located on the passenger side fenderwell, right behind the battery. Just make sure you reconnect the wire on that top connector when you go to try to start the car, or it won't turn over and you'll be very confused as to what's gone wrong. I've done it countless times, and feel like a moron each and every time.

Now, once you get the engine lined up where you want it, it's time to drop the distributor in! You'll want to line the rotor up with the number one position on the distributor cap, which is about 11 o'clock:

If you're not sure, you can go by the cap itself--the number one position is marked.

At this point, the distributor should be dropped in far enough that the rotor is engaged, but there's one more important step. The bottom of the distributor shaft is also what drives the oil pump, and that has to be lined up so that it will drop in all the way. If you look at the base of the distributor, you'll notice that it's sitting slightly above the block. This is because the oil pump driveshaft isn't engaged yet. The way to get it engaged is to hold the distributor with one hand (might want to put just a little down pressure on it) and then turn the engine over as described previously. Shouldn't take more than half a turn and it'll drop into place.
Once you've got that done, reinstall the distributor cap and your plug wires, and assuming you did everything right, it should run. If it fires but doesn't quite take off and run, you probably got it in 180 degrees out of phase. If that's what happened, then turn the engine over so that the rotor is pointing at the number one position again, pull the distributor out, turn the engine over one more turn, and drop the distributor back in. Now it should be right.
Got it running? Great! Now you need to get your timing set correctly.
The title of this thread said that it was partially carb specific, and this is the carb specific part. For you CFI/EFI guys, everything up to this point is the same.
On the driver's side fenderwell, you'll see the Duraspark box, which will have either two or three connectors coming out of it, depending on which generation of Duraspark you have (DSII vs. DSIII). DSII boxes have two connectors, one with three prongs and one with two. DSIII boxes have three connectors, one with three prongs and two with two prongs. It's one of the two prong connectors you'll want to disconnect. On DSII systems it's easy--there's only one to choose from. On DSIII systems, disconnect one of the two prong connectors and see if you can start the car. If it starts, you got the right one. If not, reconnect it and disconnect the other one.
Once you've deciphered your connectors, the male end of the one you disconnected needs to be bridged. If you've got a piece of wire with alligator clips on either end, that works great, or you can sometimes stick a screwdriver in there. Get creative.
Next step is to disconnect and plug off the vacuum advance hose, which, just in case you donít know, is this one right here:

For a plug, whatever is handy and will fit into the end is fine. I usually dig up a sheet metal screw and stick it in there. Again, get creative and youíll find something that works fine.
Before you go any further, youíll want to mark the location of your base timing on the damper. Stock is 10 degrees BTDC, but some non-stock applications will require more or less, so use whatever youíve figured out to be right in the past. The reason youíll want to mark it is that it can be very difficult to see those timing marks with the engine running. I usually use white chalk as it seems to mark the damper just fine even if thereís a little bit of oil or grease on it, and itís easy to wipe it back off if you want to mark a different spot later on.
Now, hook up your timing light according to the manufacturerís instructions, making sure to keep the cables out of the way of the fan and belts. Start the car, and trigger the timing light at the balancer. Hopefully youíll see your timing mark around the general vicinity of the reference mark. Take hold of the distributor and turn it until the mark you made on the balancer moves up to align with the reference mark. Turning the distributor clockwise will advance it, and counterclockwise will retard it.
After thatís done, shut the car off, disconnect the timing light, reconnect the vacuum advance, and reconnect the plug on the Duraspark box.
Hope this is helpful the next time you have to pull the distributor from your engine!

