Announcement

Collapse
No announcement yet.

EATC in a Box

Collapse
X
 
  • Filter
  • Time
  • Show
Clear All
new posts

    EATC in a Box

    Alright, I guess I'll start posting info on the swap. I never organized anything into an actual write up, and don't have access to my pictures and diagrams that are currently at home so this first post will be just general details.

    The swap I did was EATC from a 1997 Lincoln Town into my 1991 Mercury Grand Marquis GS which had ATC stock. There are some bugs that I haven't worked out though, I'll get into that later. I haven't even bothered to do any troubleshooting since I have a workaround and no time to actually fix it.


    90/91 requires very little physical modification to the dash. Make the rectangular hole slightly larger (I never actually took any measurements) on top and the sides, widen the holes in the dash for the locating tabs on the back of the new unit's face/mounting plate, and you may need to enlarge a couple of the screw slots inward a hair on the new unit's face/mounting plate.


    For wiring:

    Grab a sunload sensor and run wires to the back of the new control unit. (I don't remember, but this might be only if you are using a Lincoln unit.)

    Newer style BDA bolts into place of the stock 90/91 BDA, then add the extra wires that the new one requires and run them to the back of the new control unit.
    After that (you know, putting your whole dash back in place) it's all wiring of at the back of the unit, and swapping the vacuum lines into the new connector that goes on the back of the new unit.
    No need for the silly TBL with a newer unit either.


    On an '89 or older box I'm not sure how much more work would be involved or if the swap would be worth the extra work.


    The system has been in place for about a year now. My car never had Working AC since I've owned it, compressor seized, but I'm certain I have the AC portion all wired in correctly. IIRC the wire colors and functions were all the same between the two systems for AC related stuff.
    The only bug I have is the unit will go into a state where it no longer controls the temperature adjustment when I try to adjust it. The display shows that I am changing temperature but actual temperature at the vents does not change. If I disconnect the battery on my car long enough to let everything reset the unit works without any issues until some time (days, weeks, months, I don't know) later when it goes back into this state.
    I have no desire to fix it, this is very low on my list of priorities if it even makes the list.

    Even when it is acting up, as described above, in self test mode I get 2 codes, one for not having engine coolant temperature input and one for not having vehicle speed input. From the schematic I had, I believe both of these inputs come form the ECM. The two wires on the back of the unit that would talk to the ECM are not connected to anything. This may or may not be the cause of my bug but, like I said, I have no desire to fix it anytime soon.

    I'll post more details, like schematics and pictures and stuff when I get a chance.
    Last edited by VicCrownVic; 03-10-2016, 04:19 PM.
    Vic

    ~ 1989 MGM LS Colony Park - Large Marge
    ~ 1998 MGM LS - new DD
    ~ 1991 MGM LS "The Scab"
    ~ 1991 MGM GS "The Ice Car"

    #2
    Should be pretty straight forward, mounting the head unit will probably be a bit different. And the BDA is the real question mark. (I had a manual control 89 I converted to late model manual rotary controls (hybrid mid90's f150 & crown vic parts).
    If the ATC blend door actuator is the same one for the 90/91 and the 89 it'll be no different than your install.

    Lets see a pic of it.

    Alex.

    Comment


      #3
      A question about 1990 Town Cars... I know the controls are manually operated but do they have sensors for coolant temp, speed & sun load too?
      1985 LTD Crown Victoria - SOLD
      1988 Town Car Signature - Current Party Barge

      Comment


        #4
        Originally posted by DerekTheGreat View Post
        A question about 1990 Town Cars... I know the controls are manually operated but do they have sensors for coolant temp, speed & sun load too?
        '90 TCs use the same system as the '90-'91 MGM/CV. I would have to look through my EATC book at home to see when those options where added, the book covers all F/M/L (Ford/Mercury/Lincoln, LOL) EATC for 1993-1997 cars and light trucks. Search Visteon EATC and you'll find that book.
        Click image for larger version

Name:	s-l1600.jpg
Views:	1
Size:	90.9 KB
ID:	1279026

        I thought I had read somewhere that the temperature setting not wanting to change was due to a software issue addressed in later models. Of course I found that information before I noticed the problem and haven't been able to find it since to confirm. When I came up with my workaround I was going off that theory of software glitch, so that theory may be true. If it is true, if I were to do the swap again I would go newer, like 2003+ MGM.
        Vic

        ~ 1989 MGM LS Colony Park - Large Marge
        ~ 1998 MGM LS - new DD
        ~ 1991 MGM LS "The Scab"
        ~ 1991 MGM GS "The Ice Car"

        Comment


          #5
          91 MGM ATC to 97 LTC EATC conversion notes

          Swapping the vacuum lines is same color for same color and the gray one for TBL is not used so it should be plugged.

          Here is my condensed version of my wiring notes, I think I made some changes during install that are not noted but they were minor changes like using different power and ground.
          Click image for larger version

Name:	91_MGM_ATC_to_97_LTC_EATC.jpg
Views:	1
Size:	219.5 KB
ID:	1279027

          And a picture from last year from my RR thread right after I installed it:
          Click image for larger version

Name:	IMG_20150704_162938545[1].jpg
Views:	1
Size:	59.1 KB
ID:	1277925
          Vic

          ~ 1989 MGM LS Colony Park - Large Marge
          ~ 1998 MGM LS - new DD
          ~ 1991 MGM LS "The Scab"
          ~ 1991 MGM GS "The Ice Car"

          Comment


            #6
            Do you have the matching BDA for your EATC head? I've been looking at retrofitting this into a vintage Jag and there are quite a few wiring differences between the heads and BDA over the years. The 95 and on heads do have data lines for connection to the PCM, which supplies coolant and speed data.

            If that data is absent and in automatic mode the head should default to defrost, low blower speed and if it still isn't seeing a rise in engine temp after 3.5 min, it will switch to floor and slowly ramp up the blower speed. This assumes that AC isn't being called for, if the system is calling for AC , it will go into that right away. The modes can be overridden manually at any time.

            Comment


              #7
              Originally posted by VicCrownVic View Post
              If it is true, if I were to do the swap again I would go newer, like 2003+ MGM.
              If I remember the wiring diagrams correctly, the AC compressor clutch is controlled by the PCM in the 2003+ versions, the earlier ones have the clutch controlled by the EATC head. For a car without a PCM, I think the 95-97 heads are the best bet for a retrofit.

              Comment


                #8
                Yes sir, my BDA is from a 1997 Town Car. The BDA came from the same car the control unit came out of actually.

                Pins 13 and 14 are the lines that would connect to the PCM and DLC. Now that you mention it I think I have observed the behavior you mentioned, but since I always run in defrost/floor mode I've only noticed it switch to just defrost once.

                That is also good to know about the 2003+ units requiring the PCM control the AC clutch. I did swap the vacuum assembly from a 2003 unit though. The o-rings that fail are easy to service on the '03+ units, although I was told that '97 shouldn't be prone to this issue. The '97 assembly has separate power and ground for each solenoid while the '03+ have shared power or ground (I don't recall which), so I had to swap the electrical connector to make it work. Physically all I had to do was drill 2 holes in the rear of the housing for the screws that secure the assembly. The vacuum lines were in the same position and even use the same connector between '97 and '03.

                Thanks for the info!
                Vic

                ~ 1989 MGM LS Colony Park - Large Marge
                ~ 1998 MGM LS - new DD
                ~ 1991 MGM LS "The Scab"
                ~ 1991 MGM GS "The Ice Car"

                Comment


                  #9
                  I want to put it in my box but it'll mainly be for looks, since I removed AC and really only want it for the look of it.

                  Guess I'm just that asshole.
                  __________________________________________________


                  1985.03 Crown Vic. Coupe "CVGT" Build thread - china whirlybird, burnout machine.
                  The only 6 speed box on a late model frame.

                  Originally posted by SVT98t
                  It has air ride. I've disabled it since I've been jacking it up and down.

                  That is how you're supposed to jack it.

                  Up and down.

                  -ryan s.

                  Comment


                    #10
                    Nah, nobody will know it's just there for looks unless you tell them or they spend a lot of time in your car and have a chance to use it.

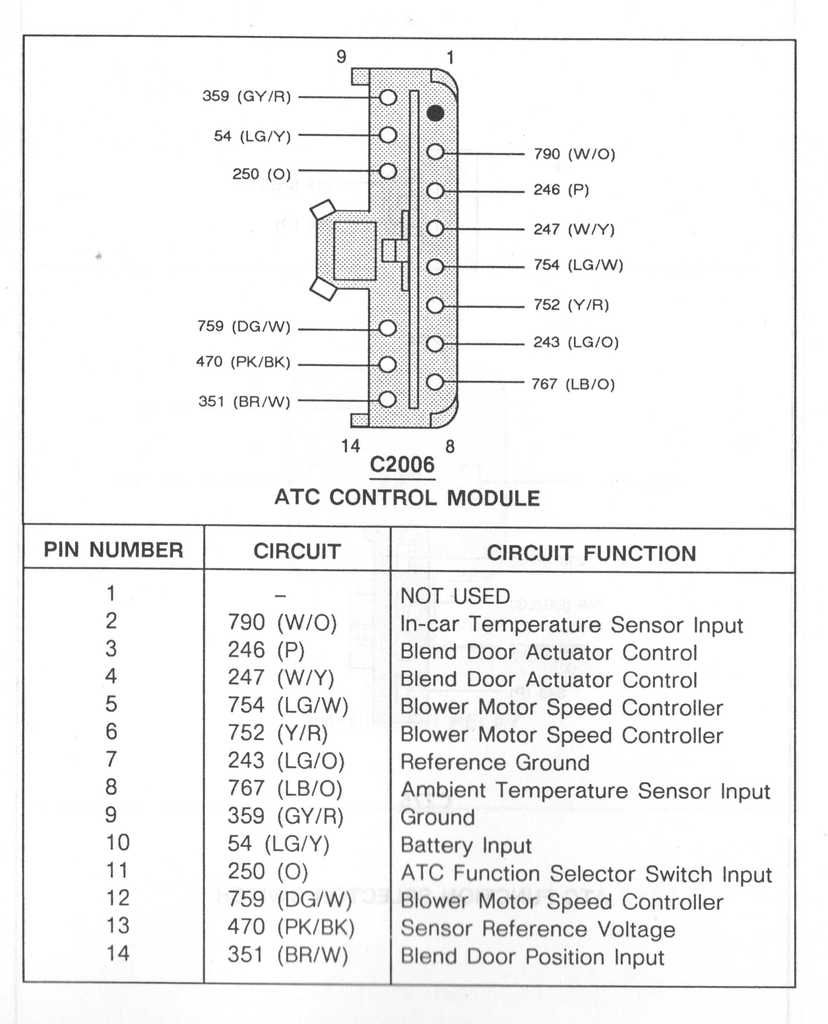
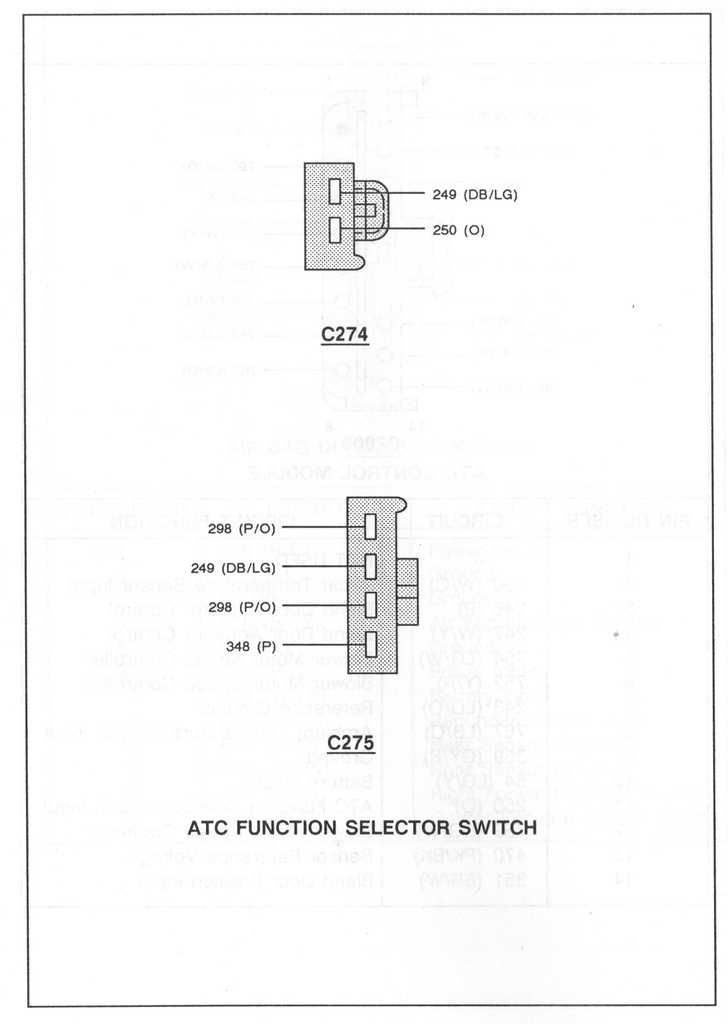
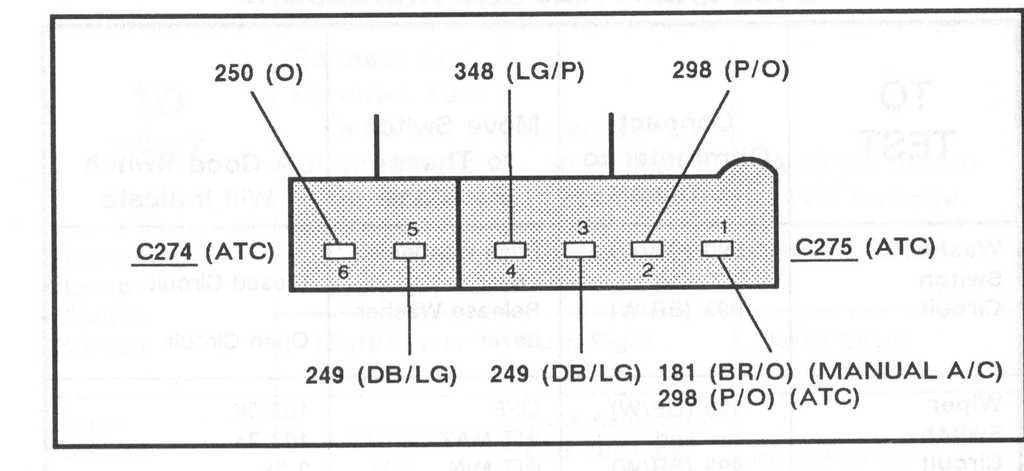
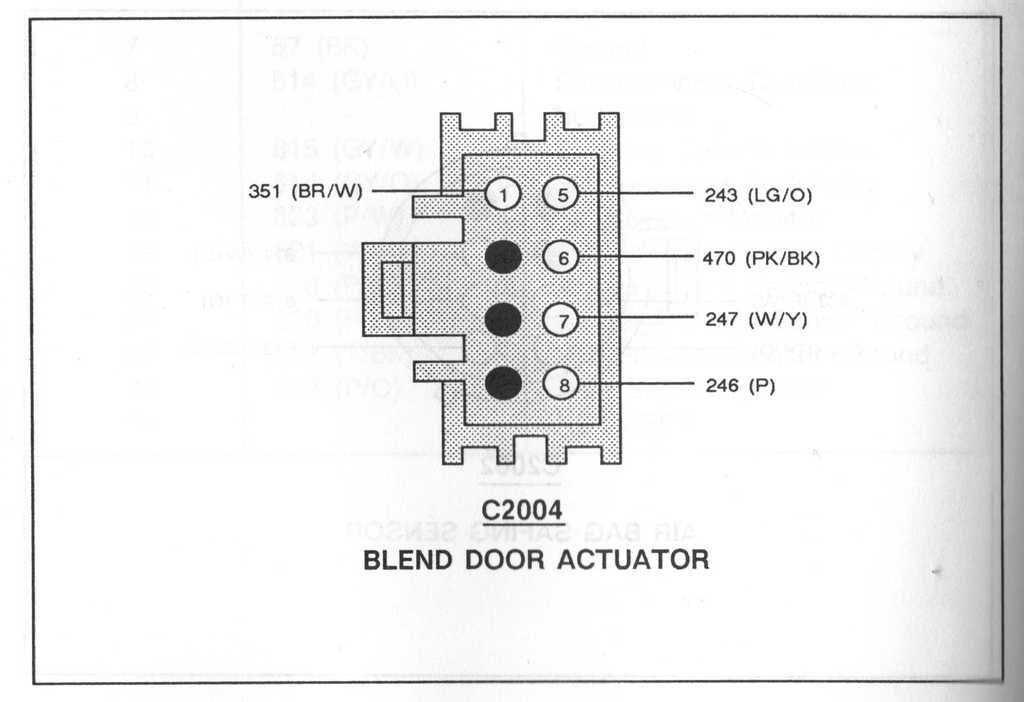
                    I finally got around to scanning pin-outs/diagrams that I used to figure out the wiring.
                    For the '91 Panther ATC:
                    C2006:


                    C274 and C275:


                    C2004 (BDA):


                    I don't have an image for C2035, but it's just power and ground for the '91 Panther ATC illumination.


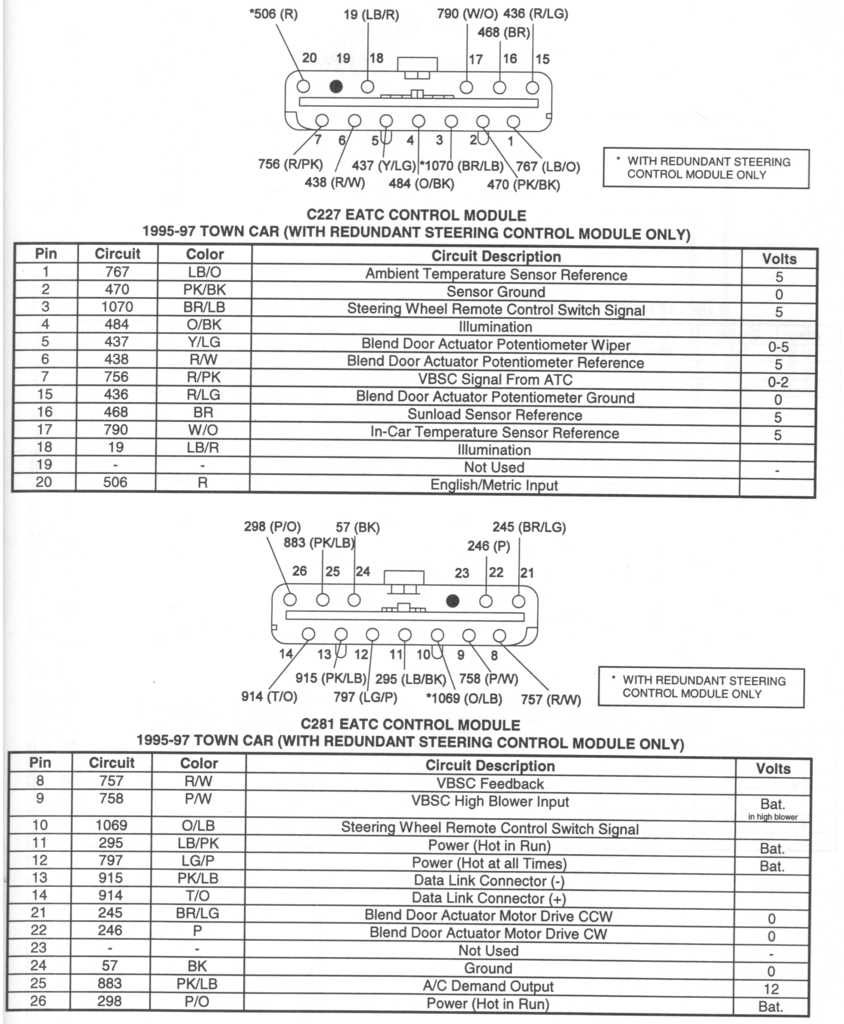
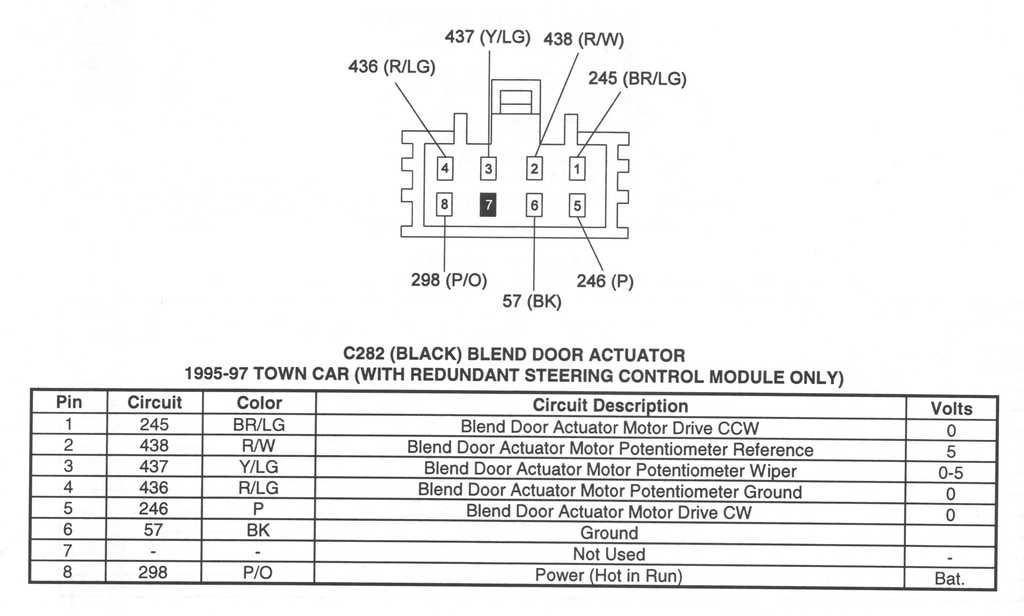
                    For the '97 LTC EATC:
                    C227 and C281:


                    C282 (BDA):
                    Vic

                    ~ 1989 MGM LS Colony Park - Large Marge
                    ~ 1998 MGM LS - new DD
                    ~ 1991 MGM LS "The Scab"
                    ~ 1991 MGM GS "The Ice Car"

                    Comment


                      #11
                      My only issue is that the electronic, later dials wouldn't utilize the same cable style to open and close the blend door. So I'd have to get a bunch of parts off a towncar.

                      I'm not sure, I may look into tearing apart my whale carcass and seeing what I can swap over.
                      __________________________________________________


                      1985.03 Crown Vic. Coupe "CVGT" Build thread - china whirlybird, burnout machine.
                      The only 6 speed box on a late model frame.

                      Originally posted by SVT98t
                      It has air ride. I've disabled it since I've been jacking it up and down.

                      That is how you're supposed to jack it.

                      Up and down.

                      -ryan s.

                      Comment


                        #12
                        If the whole box that contains the heater core and blend door is a direct swap from a 90-91, then this swap might be doable in a 89-older box. You would still need to swap the blower motor controller and I'm not sure if that would require swapping the blower motor as well (I don't think it would, but don't know for sure).
                        Vic

                        ~ 1989 MGM LS Colony Park - Large Marge
                        ~ 1998 MGM LS - new DD
                        ~ 1991 MGM LS "The Scab"
                        ~ 1991 MGM GS "The Ice Car"

                        Comment


                          #13
                          Pretty sure you could bolt a 2012 air plenum in a 1980. They are damn similar and mount the same.
                          Not sure on a 79 since those had all those weird 1 year only parts and the a/c setup was different.
                          2020 F250 - 7.3 4x4 CCSB STX 3.55's - BAKFlip MX4
                          2005 Grand Marquis GS - Marauder sway bars, Marauder exhaust, KYB's
                          2003 Marauder - Trilogy # 8, JLT, kooks, 2.5" exhaust, 4.10's/31 spline, widened rear's, metco's, addco's, ridetech's 415hp/381tq
                          1987 Colony Park - 03+ frame swap, blown Gen II Coyote, 6R80, ridetechs, stainless works, absolute money pit. WIP

                          Comment


                            #14
                            If my car was a digidash car I'd want to do this swap! Always thought it was funny seeing the digital dash display paired up with analog HVAC controls. Other Fords had digital climate controls for chrissakes, why couldn't they spring for that in a Town Car? Should've been an option at least. I'll be right back, going to go back in time and fix those changes as well as make the HO standard...
                            1985 LTD Crown Victoria - SOLD
                            1988 Town Car Signature - Current Party Barge

                            Comment


                              #15
                              Originally posted by VicCrownVic View Post
                              On an '89 or older box I'm not sure how much more work would be involved or if the swap would be worth the extra work.
                              I can actually answer that question for you now. As a few of you may know, I recently took on the idea of retrofitting a 98+ style EATC into my 86 Vic 2 door that came with ATC from the factory.
                              The idea was kinda hastened as I ballooned my heater core (oddly enough I had a restrictor on the inlet hose to the core).

                              Anywho, the base wiring was removed from a 2000 grand marquis. I harvested the entire dash, partial interior and complete underhood and engine bay harnesses (for future projects). The donor had everything I needed except for the control unit itself.

                              The first order of business, was figuring a way to make the blend door actuator mount to the factory hvac plenum for the car. From my short time researching, i discovered that the physical movement of the 98+ and 86 style blend doors from hot to cold was the same distance. Very convenient! I utilized the ATC box as it had the provision for the sample hose for the sensor. And also it had a lovely bracket that held the old temperature/ blower speed vacuum servo, which ended up being a perfect spot to design a mount for the actuator. The stock blend door connected to this servo via a press clip on top of the Z shaped lever. The blend door on the newer cars use an L shape in which the actuator slides over top of it, engaging the lever fully and rotating to achieve hot or cold and anywhere on between blend door movement. Removing the top vertical piece from the lever and adding some metal to the top of the new L yielded full engagement of the actuator to the lever. A few pieces of all thread done welding, cutting, grinding, a bunch of nuts, and we had a mount.

                              The mount, which I will include in pictures later attached to the bracket with 2 pieces of all thread and a conveniently placed hole in the top cover of the heater core. Electronically testing yielded full operation of hot and cold positions of the blend door.

                              The sunload sensor was another hurdle which got a quick and easy solution. The sunload sensor is used to tell the control head that it may need to adjust the blend door/ fan speed based on how bright the sun is. This is normally located on the passenger side of the dash, mounted in the black plastic achieve panel that covers the defroster ducts and also houses the day/night and theft deterrent lamp for the security system. Clearly I didn't have that. So I didn't have a place to mount it. Or did I? The A pillar trim had enough room to fit the sensor lens in it. However it did not have enough clearance between the firewall end the a-pillar trim to fit the entire sensor and housing properly. So what I did was separate the actual sensor from the housing, cut the sensor leads, add wiring, and make the base of the sensor housing which was also the connector a separate entity. This worked very well. Drilling a hole in the a-pillar trim where it was exposed to sunlight and clear from the dash pad I was able to mount the sensor.

                              The next issue that I had to overcome was the blower motor controller. What I found was that the opening in the evaporator unit was large enough to fit the blower motor controller. All I needed to do was make extra holes to line up with the mounts for the controller. What ended up happening was I mounted the controller upside down so as not having to grind or cut any of the material off of the evaporator housing. This actually makes accessing the connector easier as it is facing towards the passenger side instead of the driver side on eatc vehicles.

                              The final mounting of a new piece of equipment was the new electronic interior air temperature sensor. Luckily, it was able to mount in the same spot as the factory vacuum controlled unit. All that needed to be done was a small hole drilled to allow a small screw to go through the dash to mount the sensor to the dash. The factory sample hose easily connected to this.

                              The wiring was probably the easiest part of the entire conversion! Most of the harness was unmodified other than being removed from the rest of the wiring from the donor car. Some notable mentions, the wiring for the blend door actuator changes colors Midway through harness. It may be confusing as the colors coming from the control unit and the colors at the blend door actuator are the same color. However, the red / light green wire becomes dark blue at a connector prior to reaching the blend door actuator. I had initially missed this and was confused as to why I was getting blend door actuator failure codes on my self test. Thankfully I figured this out before actually going through and wiring and installing in the car. Yes you can bench test the system without it being in the car.

                              The interior air temperature sensor wiring will need to be extended to reach the sensor and allow enough slack for the harness to sit nicely behind the dash.

                              The sun load sensor wiring was a bit too long but it wasn't a big deal I left that alone.

                              Power and ground and illumination were obtained through the factory climate control wiring. This unit uses a key on and constant 12 volt input. I utilized the key on 30 amp fuse that powered the blower motor to also power the climate control unit. The constant 12 volt input I piggybacked off of the 12 volt constant from the radio which oddly enough was the same color. Ground what obtained from the green 8 pin connector. That is also where I obtained the illumination for the buttons. I left the vfd dimmer wire out as it honestly isn't that bright at night.

                              In order for the unit to control air conditioning you will need to put a relay in place. The factory unit Powers the compressor clutch so the wires are very thick. The eatc wiring is a smaller gauge and you will most likely burn out whatever is sending the 12 volt signal for the AC control. Looking at the diagrams, the eatc command for the AC goes to the PCM. The PCM in turn then activates the wide open throttle cutout relay which operates as a normally open relay whereas the Box operates as normally closed. So adding the relay takes the load off of the climate control unit.

                              The blower speed controller and related wiring utilize both the donor and my existing wiring for the blower motor resistor. I only drilled one hole in the firewall to add the exterior temp sensor and subsequently the rear ABS wheel speed sensor wiring for when I get around to doing that in this car. The existing orange wire from the vehicle that went to the blower motor was retained so I did not have to run extra wires under the hood. I utilized the factory resistor ground which was bolted to the passenger side fender as the ground for the blower speed controller. The blower speed controller wiring was connected to the original blower motor resistor wiring which two of the three wires were the same color. I had to Loop the yellow/red wire at the green connector at the dash and connect them together. I stole the connector off of the automatic blower speed controller Servo switch and connected the eatc wiring to that and did the same under the hood to the blower speed controller wiring. This yielded everything I needed to make the system work.

                              Comment

                              Working...
                              X