Announcement

Collapse
No announcement yet.

So you want to do the 3G alternator upgrade README

Collapse
This is a sticky topic.
X
X
 
  • Filter
  • Time
  • Show
Clear All
new posts

    So you want to do the 3G alternator upgrade README

    First, check out this thread for the wiring diagrams.

    Also, check out the swap page: http://www.grandmarq.net/85crownLX/p...lternator.html

    very good pics in this thread

    You will need a 3G alternator from one of the following vehicles:
    93-99 narrow-eared non-DOHC Taurus 3.0L V6 (Vulcan)
    94-95 V8 Mustang
    94-00 V6 Mustang
    94-97 V6 T-Bird/Cougar
    95-98 Windstar (3.0L V6 Vulcan)
    91-94 V6 Lincoln Continental.

    The lower bolt hole on the alternator may need to be drilled out to accept the bolt from your panther, and unless you tap the top hole, you will need to use a bolt/nut arrangement for the top hole.

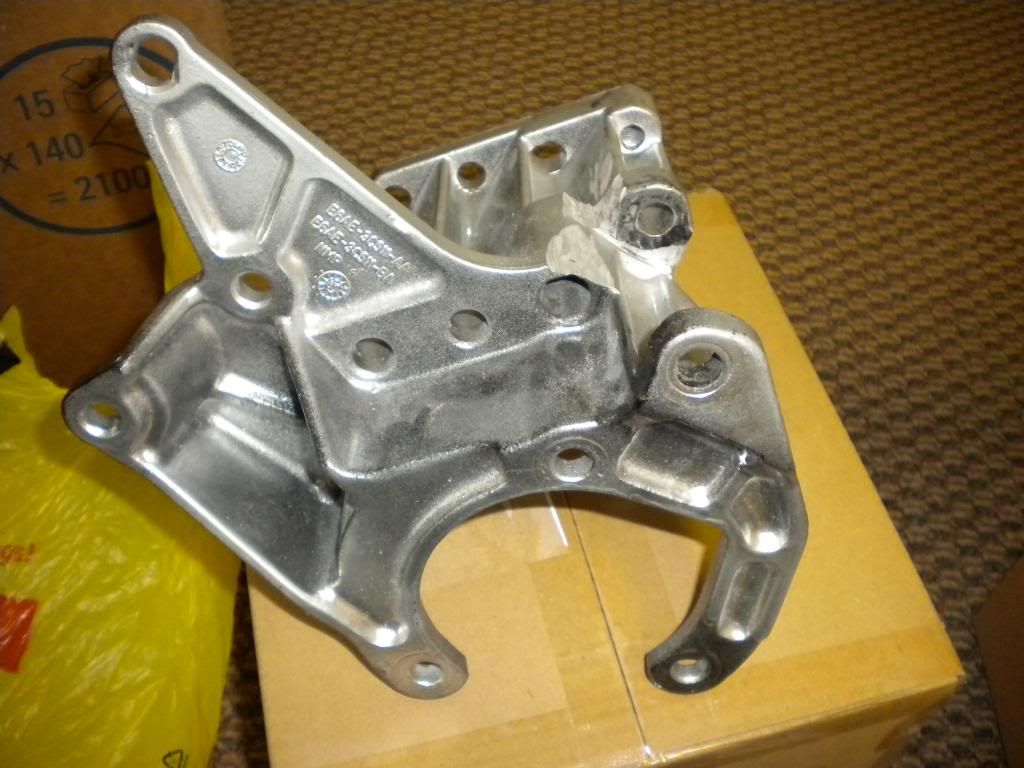
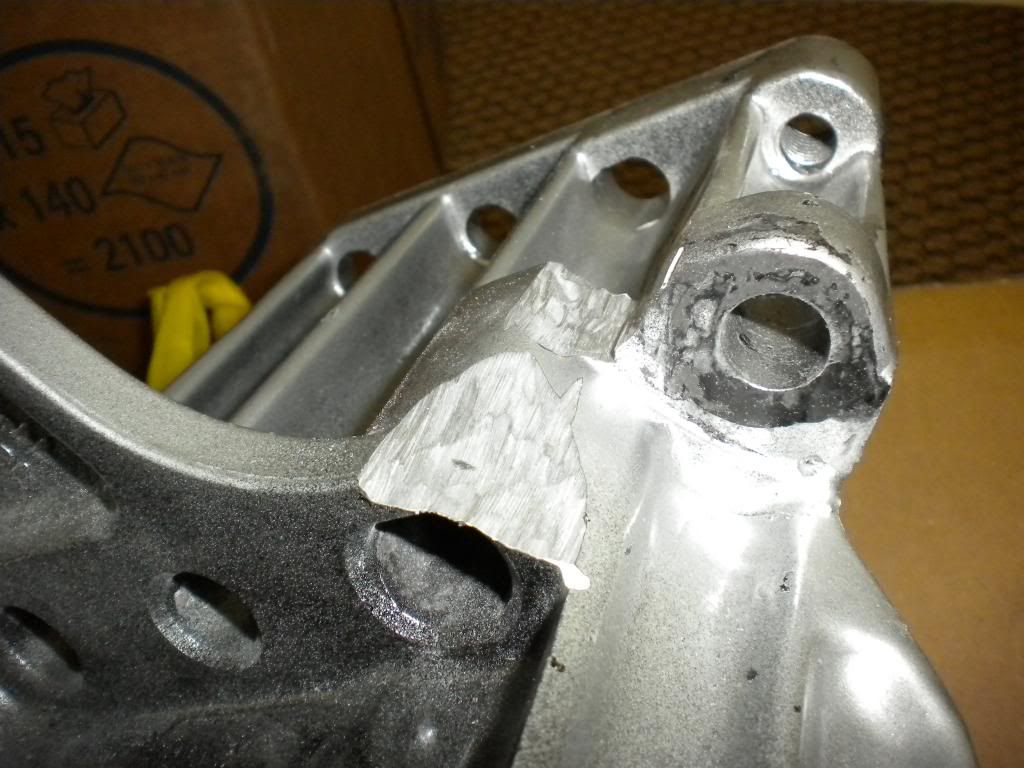
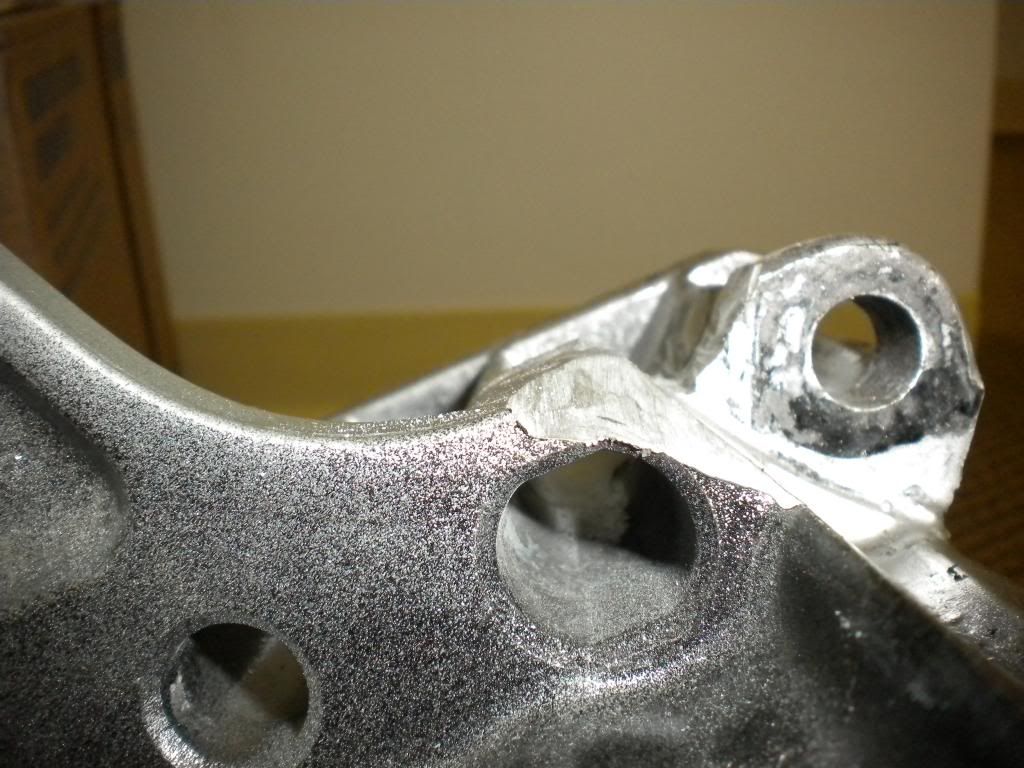
    You may also need to grind the mounting bracket that the lower bolt mounts in to allow greater movement for putting the belt on. This means the crank side of the valley between the tabs that the bolt threads through and clearance the head side tab towards the water pump so the case bolt lump will have more room to move. (post #13 for pics)

    Don't feel like alternator hunting in junk yards, then get an all-in-one kit with the alternator and all the small parts needed:


    Best bet for handy parts kits is Late Model Restoration's alternator stuff. A couple of other small items are available elsewhere. These are the best deals I've found as of this post.

    - small parts kit (if you want to do most of the wiring yourself and know what you're doing - 2G regulator connector will plug into the 3G - but needs modified): http://www.latemodelrestoration.com/...mall-Parts-Kit
    - Just the stator plug if you have your own shrink wrap and solder/crimps: https://lmr.com/item/LRS-14290C/94-0...ng-Stator-Plug
    - conversion kit (less wiring to do): http://www.latemodelrestoration.com/...onversion-Wire
    - 10 foot Charge cable (this can be routed the same way the stock charge cables are - megafuse should be closer to the the battery): https://lmr.com/item/SVE-9902A/Musta...-Suppression-3
    - cable boot (cover the nut on the alternator): http://www.delcity.net/store/3:8!in-...ulators/p_1033
    - OPTIONAL - Battery post extension: http://store.alternatorparts.com/f1-452-038.aspx (typically less on eBay)
    - OPTIONAL (not needed - but may improve longevity on high rev applications) - 6G clutch pulley http://www.nationsstarteralternator....-p/24-2279.htm or http://store.alternatorparts.com/partno242279.aspx
    -- Clutch pulley tool (needed to install/remove clutch pulley): http://store.alternatorparts.com/126...nd-r-tool.aspx

    Once the alternator is prepped for fitment (bottom bolt hole drilled out if needed, bracket ground down on the crank side to allow greater motion of the new alternator), dry fit the alternator to make sure you're done with that part.

    The wiring will depend on if you're upgrading from a 1G or a 2G. There are adapters to make a 1G swap easy, but you can also just splice the wires yourself. Check the wiring diagrams in the first link at the top of this post. If using the swap connector (required for the upgrade from 1G), the wire colors are the same and you just splice the matching wires. If you have the 2G, you only need the small parts kit and will splice the white wire (middle wire). Connect your charge cable and plug it all in. Set the belt tension and tighten everything up, and you're done. Enjoy a job well done and better electrical power.

    (if anyone wants to add pics, please do)

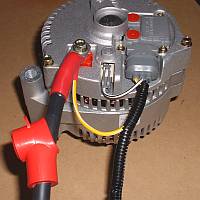
    Pic of 130A vs 95A alternator...
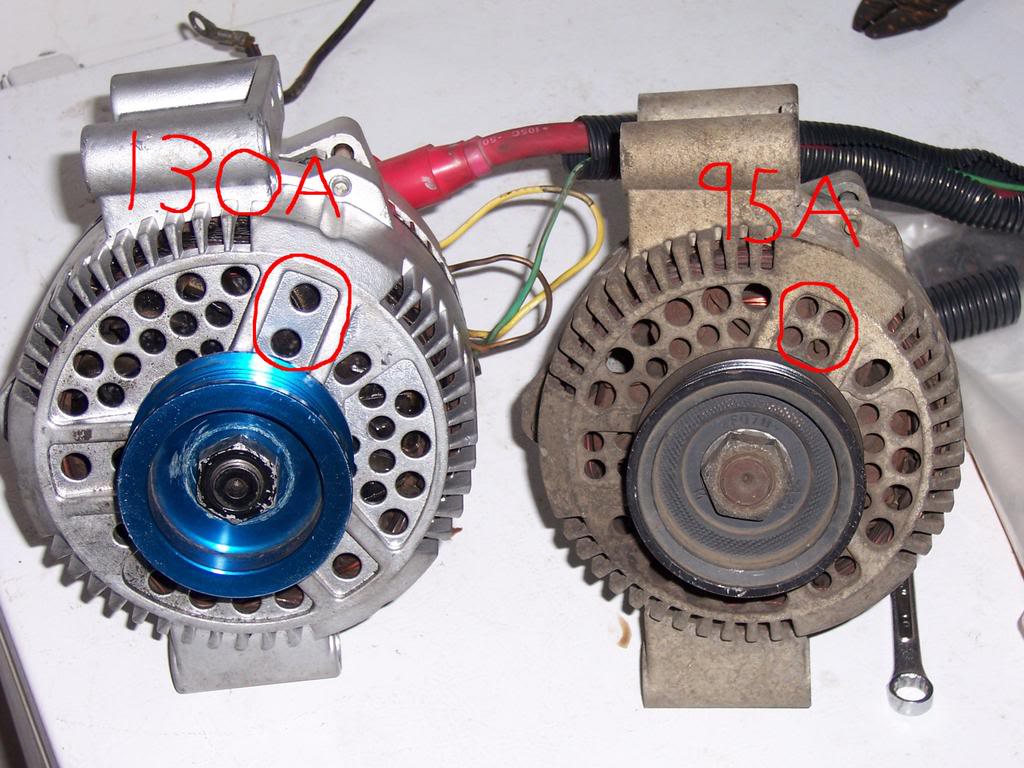

    Links updated 11/17/2016
    Attached Files
    Last edited by sly; 10-17-2022, 02:38 PM.

    Only two things are infinite, the universe and human stupidity, and I'm not sure about the former. -- Albert Einstein
    rides: 93 Crown Vic LX (The Red Velvet Cake), 2000 Crown Vic base model (Sandy), 2003 Expedition (the vacation beast)

    Originally posted by gadget73
    ... and it should all work like magic and unicorns and stuff.

    Originally posted by dmccaig
    Overhead, some poor bastards are flying in airplanes.

    #2
    Simplified instructions via GM_Guy

    Originally posted by GM_Guy View Post
    Read here;


    And simplified instructions attached.
    Whatever parts store you use will be able to cross reference the wells number if needed.

    Alex.

    Only two things are infinite, the universe and human stupidity, and I'm not sure about the former. -- Albert Einstein
    rides: 93 Crown Vic LX (The Red Velvet Cake), 2000 Crown Vic base model (Sandy), 2003 Expedition (the vacation beast)

    Originally posted by gadget73
    ... and it should all work like magic and unicorns and stuff.

    Originally posted by dmccaig
    Overhead, some poor bastards are flying in airplanes.

    Comment


      #3
      Another good picture. The yel/wht "S" wire can also be connected to the B+ on the alternator instead of running it all the way back to the solenoid.


      Sent from my '85 Lincolin Town Car
      Last edited by kodiak; 04-28-2014, 11:46 AM.
      Using Tapatalk

      Comment


        #4
        I was going to do this over the weekend, but I discovered that the terminal ends that I have on my 4G cable won't fit the alternator terminal. So I cut a short length of 6G and used a narrow terminal end (drilled out a bit) for the alternator side and then bolted that to the 4G cable. I am going to route the cable along the front of the radiator support alongside the headlight wiring. My alternator was modified by the shop I got it from because they have been doing this upgrade for quite some time now. Had I got that at the JY, I woulda been screwed.


        Packman

        Comment


          #5
          I'd like to add that it is not necessary to keep the stock charge wires around - the reason some people keep them is that the original stator wire for a box is part of the charge wiring and wont be active if it is all left disconnected. This is easily taken care of by fishing the stator wire out of the regulator plug loom and joining it to the stator plug, like you see in the pic. This example shows a hard-wire self-sense application, but it shows all the wiring that's needed.

          Pete ::::>>> resident LED addict and CFI defector LED bulb replacements
          'LTD HPP' 85 Vic (my rusty baby) '06 Honda Reflex 250cc 'Baileys' 91 Vic (faded cream puff) ClifFord 'ODB' 88 P72 (SOLD) '77 LTDII (RIP)
          sigpic
          85HPP's most noteworthy mods: CFI to SEFI conversion w/HO upperstuff headers & flowmasters P71 airbox Towncar seats LED dash light-show center console w/5 gauge package LED 3rd brake light 3G alternator mini starter washer/coolant bottle upgrade Towncar power trunk pull underhood fuse/relay box 16" HPP wheels - police swaybars w/poly rubbers - budget Alpine driven 10 speaker stereo

          Comment


            #6
            I kept all of my stock wiring. I re-pinned the regulator connector with a stator wire harvested from the donor vehicle. Add the charge wire and fuse and it's done. I tucked the old plug down behind the alternator. I'm not chopping it, as that harness (in good condition) is unobtanium around here.
            1990 MGM: $50 E7 heads, HO cam, Holley SysteMAX lower intake, HO upper intake with an Explorer TB. LSC ECM. Lincoln logs into stock dual exhaust. K&N drop in air filter. Wide ratio AOD, 2400 converter with a 3.08 one tire fire out back. Car is less slow now. Then there's the '92 Beater. Dual 2.25" exhaust with shiny tips. Rumbles nice. Super slow. Burns oil too.

            Comment


              #7
              I just put a 3G on my car today and now looking at some write-ups again, it says you have to cut the yellow wire and run it to the +, some it says no.
              In the pics posted by sly and kodiak above, it's not cut(or doesn't appear to be).
              The pic posted by sly shows that the regulator plug is untouched(I know that the white wire just loops to the other plug and the cut can be made on either)
              The pic posted by 85crownHPP shows the wire cut/spliced and routed to the charge terminal.
              1989 Country Squire - Twilight Blue, 347 stroker


              2005 Crown Victoria Sport - Black - Stainless Works full exhaust with Borla Pro XS mufflers, BBK 75mm TB, Accufab plenum, CVPI airbox, Heinous control arms, etc...

              Comment


                #8
                I've read that the yellow wire senses voltage and should be connect to the hot side of the solenoid. I chose to connect right at the alt 12v output.

                I wired mine just like in the pic I posted. I'm in awe of how bright all my lights are and believe it or not my motor idles smother too!!

                So for me the only wire I ran was a 4 ga charge wire. I also connected the choke to the "S" wire.

                Sent from my '85 Lincolin Town Car
                Last edited by kodiak; 05-05-2014, 02:51 AM.
                Using Tapatalk

                Comment


                  #9
                  Yellow wire senses battery voltage to properly adjust alternator's output. Ford ran it to the solenoid so that it can sense actual battery voltage (since there's a pretty good voltage drop with the OEM charging wires). You can leave it stock, like I did, or you can loop it around to the charging stud since there should be very very minimal voltage drop with the upgraded charging cable.
                  Originally posted by gadget73
                  There is nothing more permanent than a temporary fix.
                  91 Mercury CP, Lopo 302, AOD, 3.08LSD. 3g upgrade, Moog wagon coils up front, cc819s in the back. KYB GR-2 police shocks. Energy suspension control arm bushings. Smog deleted.
                  93 F-150 XLT, 302, ZF 5-spd from 1-ton, 4wd.
                  Daily--07 Civic Coupe. Bone stock with 25k miles
                  Wife--14 Subaru Outback. 6-speed.
                  95 Subaru Legacy Wagon--red--STOLEN 1/6/13

                  Comment


                    #10
                    I opted to leave the regulator harness alone and did what is pictured in SLY's post. Currently cutting the alternator bracket to increase pivoting for the belt. Luckily, I had a spare bracket set from the '90 MGM. I may snag another bracket set if there are any box Panthers left in the JY.


                    Packman

                    Comment


                      #11
                      Alright, the yellow wire is staying as it came from the factory.


                      Sent from the crapper
                      1989 Country Squire - Twilight Blue, 347 stroker


                      2005 Crown Victoria Sport - Black - Stainless Works full exhaust with Borla Pro XS mufflers, BBK 75mm TB, Accufab plenum, CVPI airbox, Heinous control arms, etc...

                      Comment


                        #12
                        Originally posted by BlackVic_P71 View Post
                        Alright, the yellow wire is staying as it came from the factory.


                        Sent from the crapper
                        That's easier.
                        Originally posted by gadget73
                        There is nothing more permanent than a temporary fix.
                        91 Mercury CP, Lopo 302, AOD, 3.08LSD. 3g upgrade, Moog wagon coils up front, cc819s in the back. KYB GR-2 police shocks. Energy suspension control arm bushings. Smog deleted.
                        93 F-150 XLT, 302, ZF 5-spd from 1-ton, 4wd.
                        Daily--07 Civic Coupe. Bone stock with 25k miles
                        Wife--14 Subaru Outback. 6-speed.
                        95 Subaru Legacy Wagon--red--STOLEN 1/6/13

                        Comment


                          #13
                          No problems with the install as is. The belt or the alternator squeals for 5 seconds upon start-up; regardless of how tight or loose the belt is. Some pics of the cut-down power steering/alternator bracket for the large case 3G.


                          Also, you will need to cut the shoulder down on the lower p/s bolt. The bolt shoulder will prevent the alternator from pivoting down all the way.


                          Packman

                          Comment


                            #14
                            I did the 3g upgrade a year+ now an always had that same squel, dont worry about that.
                            1991 Grand Marquis LoPo 5.0

                            Comment


                              #15
                              Hey guys I just made a new 3g Swap tutorial for 89-91 Crown Vic And MGM heres the link if you want to check it out. I list all of the parts and tools youll need to get the job done along with steps to complete the job. http://www.grandmarq.net/vb/showthre...-Swap-Tutorial
                              Proud owner of a 1989 Crown Victoria LX LTD
                              • Restored The Car Back To Running Conidition
                              • Has a very well respected and cared for 107K miles on the odometer
                              • Rebuilt 4 speed AOD Transmission *Original Trans Still in Car*
                              • Rebuilt Front End with New Hub Assembly
                              • 3rd Owner (Car has been in the family since 91)
                              • They don't make cars like this anymore so it will be a definite keeper!

                              Comment

                              Working...
                              X