If this is your first visit, be sure to
check out the FAQ by clicking the
link above. You may have to register
before you can post: click the register link above to proceed. To start viewing messages,
select the forum that you want to visit from the selection below.
Please let us know if things are working or not. This is still somewhat a work in progress so don't be too surprised if things magically appear from one visit to the next.
It is easy enough to wire in a couple of resistors if you want those tail lights, I wish I had seen them before I bought the Crown Vic sport ones I used.
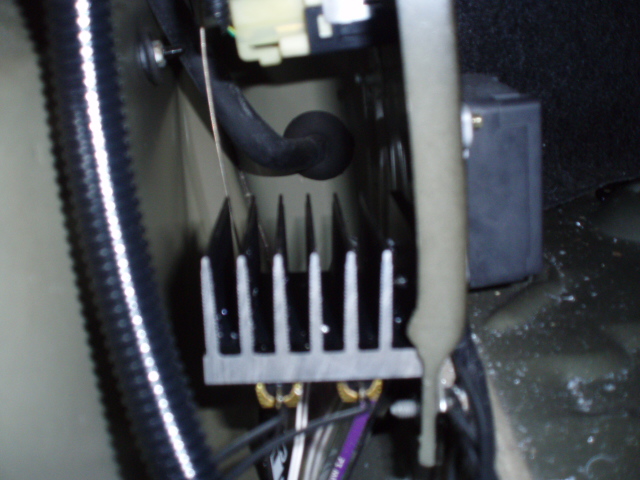
Here is a picture of my resistors on a heat sink (because they get as hot as a couple of bulbs) hidden in the trunk behind the CD player.
Regards
Dereck
President and founder of The Turbine Wheel Appreciation Society and Little Debbie Cake Connoissuer
wow cool find , well fuck , o well i have a friend with a vic here in town. he wants them too, i was worried about the chrome strip anyways. i'll give them to him
Or you could sell them to me whenever I get my school money
sigpic[LIST][*]99 Crown Vic Police Interceptor aka The Cruiser
[*]87 Chevy 20 Van 350TBI
[*]94 Mercury Grand Marquis aka Babyblue RIP
[*]83 Chrysler New Yorker 5th Ave 318 V8
thanks dereck i know how to do them i had to on my 87 merc, the tails are just enough differant kinda changed my mind and im going to do the bulb instead
sigpicTHE H.I.D MASTER
87 mercury grand marquis
88 crown vic lx
89 mercury colony park ls (sold)
89 mercury grand marquis (sold)
00 ford crown vic lx hpp
03 mercury marauder aka punisher (sold )
You do realise if you fit those tailights to your Marauder your turn signals will have a paranoic fit unless you also parrallel a couple of resistors in the circuit or you could wire in some sequential yellows behind the clear lenses.
Regards
Dereck
Hi Dereck,
Could you post come more details on how you did the sequential mod? I'd like to get those LED tails for my car and would LOVE to have sequential turn signals also. I'm also a real idiot so the more detail the better.
Thanks!
Awesome Electronic Cigarettes Stable: 2008 Toyota Tundra SR5 5.7 4x4
1990 Dodge Power Ram W150 4x4
1984 Grand Marquis Two Door Lowrider
1983 Crown Victoria Two Door
Tell me what make, model and year your car is and also does it allready have yellow turn signals or regular red rear turn signals and I will try and piece you together an idiots guide.
Regards
Dereck
President and founder of The Turbine Wheel Appreciation Society and Little Debbie Cake Connoissuer
My car is a 2003 Grand Marquis. It does not have yellow turn signals currently, the whole lamp blinks with the hazards/turn signals. I would LOVE to be able to use the LED lamps, and also have the turn signal chase, like you have.
Thanks!
Awesome Electronic Cigarettes Stable: 2008 Toyota Tundra SR5 5.7 4x4
1990 Dodge Power Ram W150 4x4
1984 Grand Marquis Two Door Lowrider
1983 Crown Victoria Two Door
1981 Mercury Marquis Brougham 2-Door 302/ 5-speed -special blend (GMGT)
1987 Lincoln Mark VII 5-speed (Errand runner)
1989 Mercury Grand Marquis (Base Runner)
2007 Lincoln Town Car Signature Limited (Hustlyn)
2011 Ford Crown Victoria Police Interceptor (Down with O.P.P)
Here goes a guide to fitting LED tail lights and sequential turn signals to your 03 Grand Marquis this job is probably going to take you at least a day and maybe a little longer, I also suggest you assemble the required parts before you start. You are also going to have to reconfigure the stop lights if you want yellow turn signals.
Parts required:
A pair of LED tail lights
Sequential turn signal module. I got mine from www.meter4it.com and used the one for a 96 � 2000 Mustang; it is designed for three bulbs so you do not use the center bulb connection.
Regular 5 pin changeover relay, I suggest you use a diode protected one
Wire
3 inline fuse holders
Wire conduit
Connectors
2 Resistors 6.8ohm x 50watts
Heat sink plus heat sink compound
4 Extra bulb holders and bulbs (From a boneyard)
First job strip out the trunk carpet and left side trunk trim, remove the CD player if you have one, remove the spare tire, jack, ETC, the pull out the rear seat ass swab, remove the sill plate trims and the B pillar lower trim, pull out the drivers kick panel and finally remove the steering column shrouds.
Now run a wire (I suggest Red in color) from the power distribution box near the battery to the trunk, I ran mine along the right fender wall, across the firewall, then through a grommet by the throttle cable, down the OEM wire conduit, (if you lift the carpet and undo a screw you can follow the factory wiring) then thread it over the rear wheel hump into the left side of the trunk. If you are using the LED tail lights then this wire only has to power the LEDs and a couple of bulbs so I would say use 10 or 15amp wire with a 15amp fuse (do not fit until all the wiring is completed) at the power box end under the hood, I also ran my wire through some conduit under the hood so it would be protected and look more professional.
Next job is to snip and insulate (I insulated my wires with some heat shrink) the Dark Green wire to the multi-function switch, this is to stop your yellow turn signals lighting up with the brake lights.
You can now put back your column shrouds, kick panel, sill plate trims, B pillar trim and rear seat ass swab
Now remove both tail lights and make yourself up an extra two bulb harness for each side using your boneyard salvaged bulb holders, this will be for your yellow turn signals, you should end up with three wires to poke through the grommet in the back panel, the inner bulb, the outer bulb and a ground wire. I suggest using black wires for the ground and different colors for the bulbs so you will know left from right, inner from outer. After poking your wires through the grommet you can fit the bulb holders in your new tail lights (remembering which turn signal bulb is the inner and which is the outer) and refit your tail lights not forgetting to connect up the stop/tail lights.
Let�s start with the stop lights.
You need to wire in a relay as in the following diagram.
So first you need to splice into the hi-level stop light feed, the easiest place to do this is where the wire runs up the rear seat back and into the stop lamp behind where the spare tire sits, run this wire around to near the fuel pump inertia switch and into pin 86 of your relay
The main wiring harness for the tail lights runs along the left side of the trunk floor, peel back some of the wrapping on this harness a few inches the rear panel and pull out the Light Green/Orange & Orange/Light blue wires, these are the left/right stop/turn signal wires, cut these two wires. Join a wire to the two ends going to the stop lights and run this wire to near the inertia switch and into pin 87 of your relay.
Run in a ground wire to pin 85 of your relay, I grounded mine on the sheet metal that the fuel pump inertia switch mounts to and then connect the power wire you ran off the distribution box into pin 30 of your relay not forgetting to fit a fuse near the relay, then mount the relay, I mounted mine behind the fuel pump inertia switch.
Sequential Turn Signals
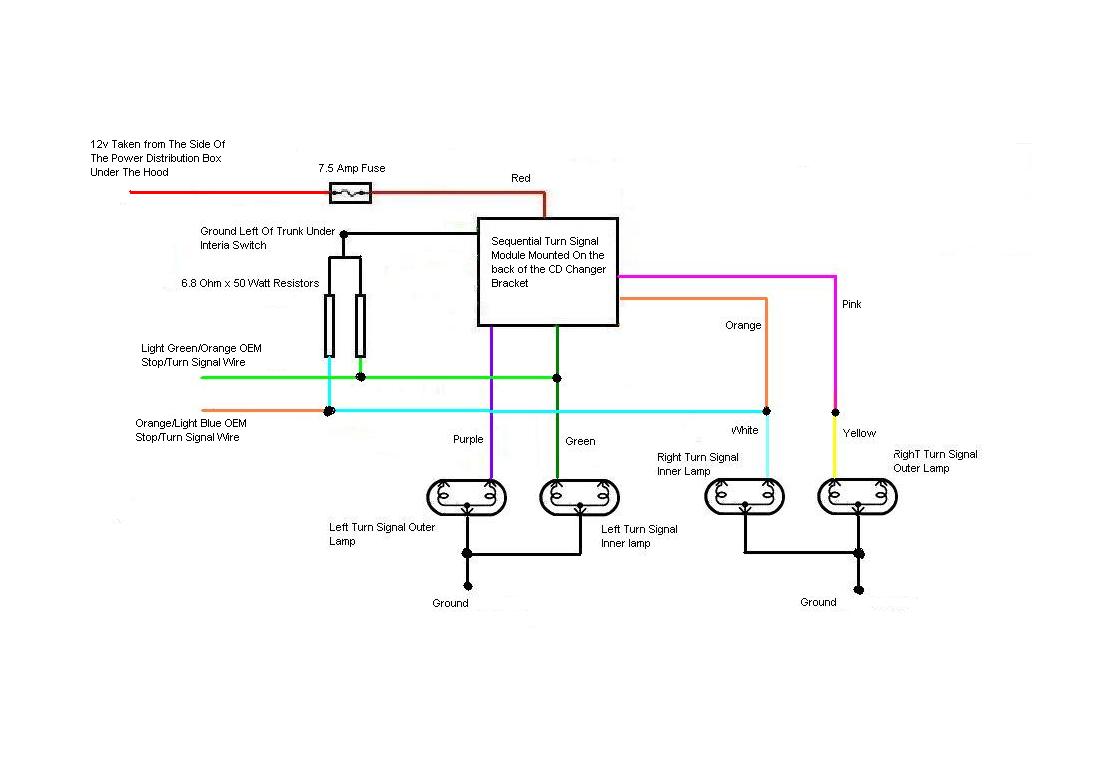
Following is a diagram for the sequential turn signal wiring, full instructions come with the module the only slight difference is the addition of a pair of resistors to simulate the turn signal bulbs removed from the circuit by the module so that your LCM doesn�t have a fit.
I mounted my resistors on a heat sink and then mounted the assembly behind the fuel inertia switch panel
Just too quickly run through the wiring, you join the Light Green/Orange (Left turn) wire from the multi function switch into the green on the module, the inner left signal bulb and one resistor.
You join the Orange/Light Blue (Right turn) wire from the multi function switch into the orange on the module, the inner right signal bulb and one resistor.
Pink on the module goes to the right outer signal bulb
Purple on the module goes to the left outer signal bulb.
Red is the power so join it via a fuse into the power wire you ran from the front of the car and black is the ground, I used the same ground as for the stop lights
Note that the module is made for a three bulb system so the blue and gray wires go unused.
I am not sure of US suppliers but the following are links to the type of resistors, heat sink and heat sink compound you will need.
Awesome Electronic Cigarettes Stable: 2008 Toyota Tundra SR5 5.7 4x4
1990 Dodge Power Ram W150 4x4
1984 Grand Marquis Two Door Lowrider
1983 Crown Victoria Two Door
")

 whenever I get my school money


Comment